Vytištěno z //web.daves.cz/index2.php?&item=209
| Author: |
| Created: 13.01.2005 - Updated: 14.01.2005 | |||
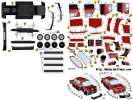
Paper Glue Tools needed : Scissors Possible problems : Lack of manual skills Difficulty : low, couple of hours Story : Follow the numbers to start building. First cut out the roof and then gradually glue to it the sides and the front. Don´t forget to shape the sides out before you stick them on. Under windows the sides bend forward at about 45° and then they connect with the curve of the door. Exact directions are probably parked under your windows, so just go and have a good look. Take the front end first and glue it together. Then shape out the car´s front and glue it on. Shaping out the front isn´t the easiest, so try to imitate the original shape as much as you can. When you manage to put it all together, add rims, and if you wish, accessories (wipers, mirrors, registration numbers, lights...) - you don´t have to glue them on, everything is there already, except for the wipers and the mirrors. As the next thing, glue the wheel frame together. That´s where the wheels will go. The whole ensemble goes into the car´s body. After that, glue on the floor. The bumpers could be a bit tricky, but I believe that you will win. Axles are made with sticks. I recommend cutting out long thin strips of paper and with the help of the glue, winding them onto the sticks until they reach the wheel´s diameter. It will save you the work with sticking on the wheel, because then you can just stick the cutting onto the wrapped wheel and whack on the disc and the axle cap from the side. Download here (534.9kb) | |||||
Materiál ze serveru daves.cz nesmí být publikován bez souhlasu autora.
David Spilka (Daves), tel.: 775 328 374, email: send email, ICQ: 109318615


